


If you are already familiar with eBird, using the portal is easy!
Quick Links
- Submitting data using the eBird mobile app
- Submitting data on a computer using a web browser
- Checking the portal
- Changing portals
If you are new to eBird, check out our tutorials page.
Submitting data using the eBird mobile app
Set the portal in the eBird mobile app by following the instructions below or watching a tutorial.
- Set the portal
Change the eBird portal to “New York Breeding Bird Atlas.” On the app home screen, tap the menu icon (Android) or more button (iOS) and then go to “Settings.” Select the “Portal” option and use the drop-down list to select the “New York Breeding Bird Atlas” portal. Return to your home screen.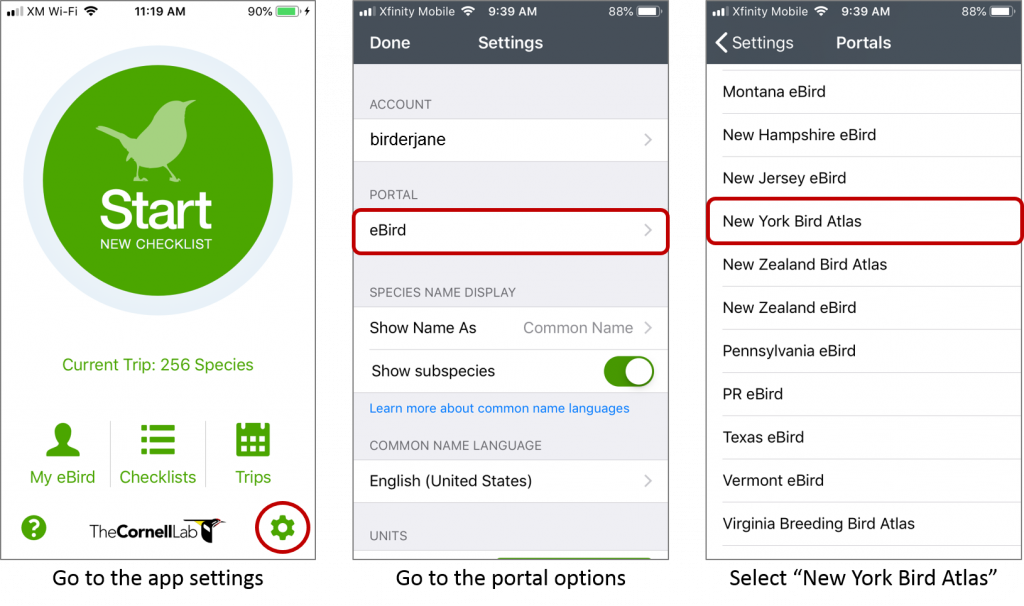
Screenshots showing how to change the portal
- Start a checklist
Start a checklist and set your location. Record your track if you have GPS signal. Make sure that when you are birding you do not cross block boundaries. If you do, start a new checklist. Bring a PDF of the block in the field with you or use the Google Earth app to determine if you are within block boundaries. - Enter species and breeding codes
Enter a count of all the birds you see and hear and record the highest breeding code for each species you encountered on this checklist.
Screenshots showing how to enter breeding codes
- Review and submit
Make sure to answer the question about whether you are submitting a complete checklist. Remember that complete doesn’t mean that all the birds in the area are recorded; it only means that all the birds you were able to identify are reported. So if you are entering all the starlings and pigeons you saw, you can say your checklist is complete.
Submitting data on a computer using a web browser
- Go to the atlas website
On the atlas website, click on “Submit” from the top menu: https://ebird.org/atlasny/submit. Make sure the URL includes /atlasny/. - Start a checklist
Log in and start a new checklist. Set location, date, and time as you normally would. The block boundaries are visible on the map so you can review where you went and enter data from within a single block. - Enter species and breeding codes
Enter a count of all the birds you saw and heard. Record the highest breeding code for each species you encountered on this checklist. Click on the “Add Details” button and use the breeding code drop-down menu to select the appropriate code.
- Submit
Review your data. Make sure to answer the question about whether you are submitting a complete checklist. Remember that complete doesn’t mean that all the birds in the area are recorded; it only means that all the birds you were able to identify are reported. So if you are entering all the starlings and pigeons you saw, you can say your checklist is complete.
Checking the portal
If you aren’t sure which portal your checklist is in, open your checklist in a web browser.
On a computer, look at the logo in the top left corner of the page:

If you see this logo, your checklist is in the atlas portal.

If you see this logo, your checklist is in the general eBird portal.
You can also look at the URL at the top of your internet browser. If it starts with “ebird.org/atlasny/checklist/”, it is in the atlas portal. If it says “ebird.org/checklist/”, it is in the general eBird portal.
Changing portals
All breeding bird observations should be submitted through the NY BBA III portal in eBird. This makes your observations available to the Atlas so they show up on the effort maps. If you enter a checklist in the wrong portal, you can change it by going to the checklist on the web. In “My eBird” go to “Manage My Checklists” on the right-hand side of the page. Find the checklist you want to switch and then select “View or Edit”. Go to “Checklist Tools” in the top right of the screen and select “Change Portal”. Use the drop-down menu to change the portal.
