


Blocks are essential to organizing any Breeding Bird Atlas. Not only do they break down a monumental task into manageable units, but they also help distribute limited resources evenly across the state.
The Atlas divides New York state into 5,710 atlas blocks, each roughly 3 x 3 miles square, based on USGS topo quad maps. In the current Atlas, we have designated the CE (center east) and NW (northwest) blocks of each grouping of 6 blocks as priority blocks, for a total of 1,815 priority blocks.
Priority blocks are where your focus should be; if you have a choice when atlasing, go to a priority block. Non-priority blocks still have value, but if you have a choice, always choose a priority block. The atlas is complete when all priority blocks are adequately surveyed. You can help us meet our goal by signing up to be the Principal Atlaser of a priority block.
This article is your guide to everything related to blocks. Below, you will find out how to plan your visits around blocks and how to navigate blocks while in the field.
Planning to visit blocks
Discover what’s been done
When you are planning an atlasing trip, your first step is to figure out how you want to contribute to the Atlas. Figure out a strategy that works for you, whether it’s focusing on a particular habitat, filling in nocturnal hours, or finishing off blocks. Read more on developing an atlas strategy.
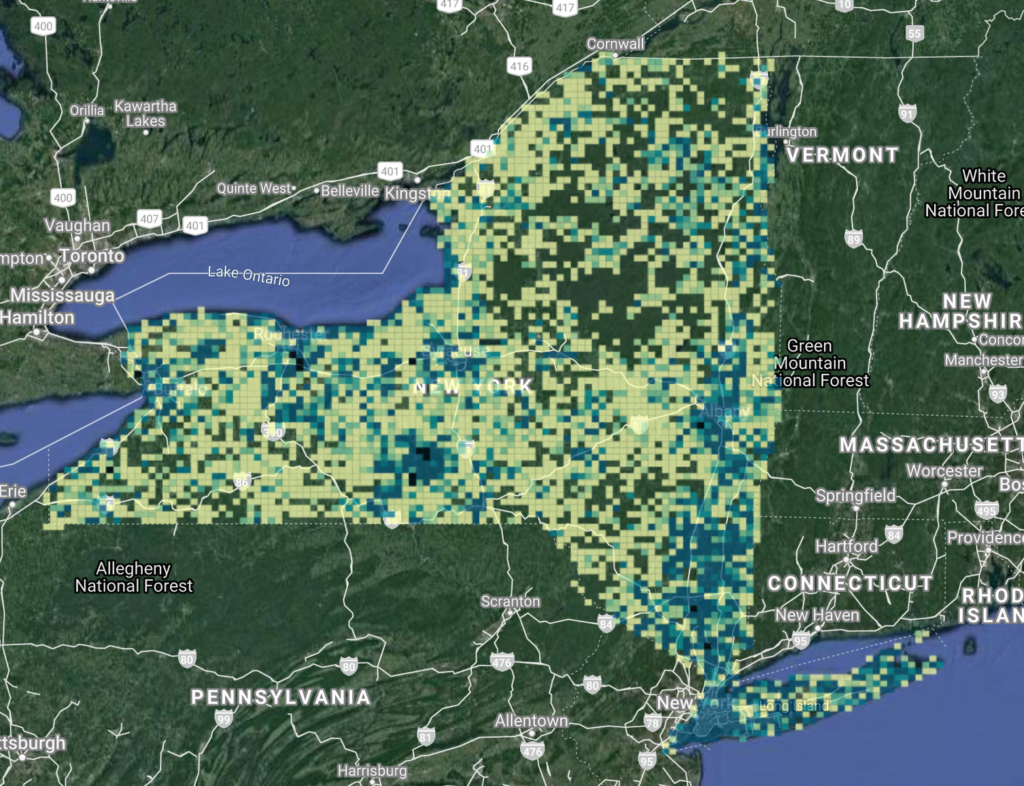
The Atlas Effort Map showing daytime hours spent in each block as of 6/5/21. Use the effort map to find blocks where more atlasing is needed.
Once you know your strategy and have honed in on where you want to go, you need to find out what has already been done in the block(s) you plan to visit. To get a list of species observed in any block:
- Go to the Atlas Effort Map and search for a block
- Click on a block and then select “View all block data”
- Sort the breeding records by confirmations by clicking on the “Breeding Evidence” column
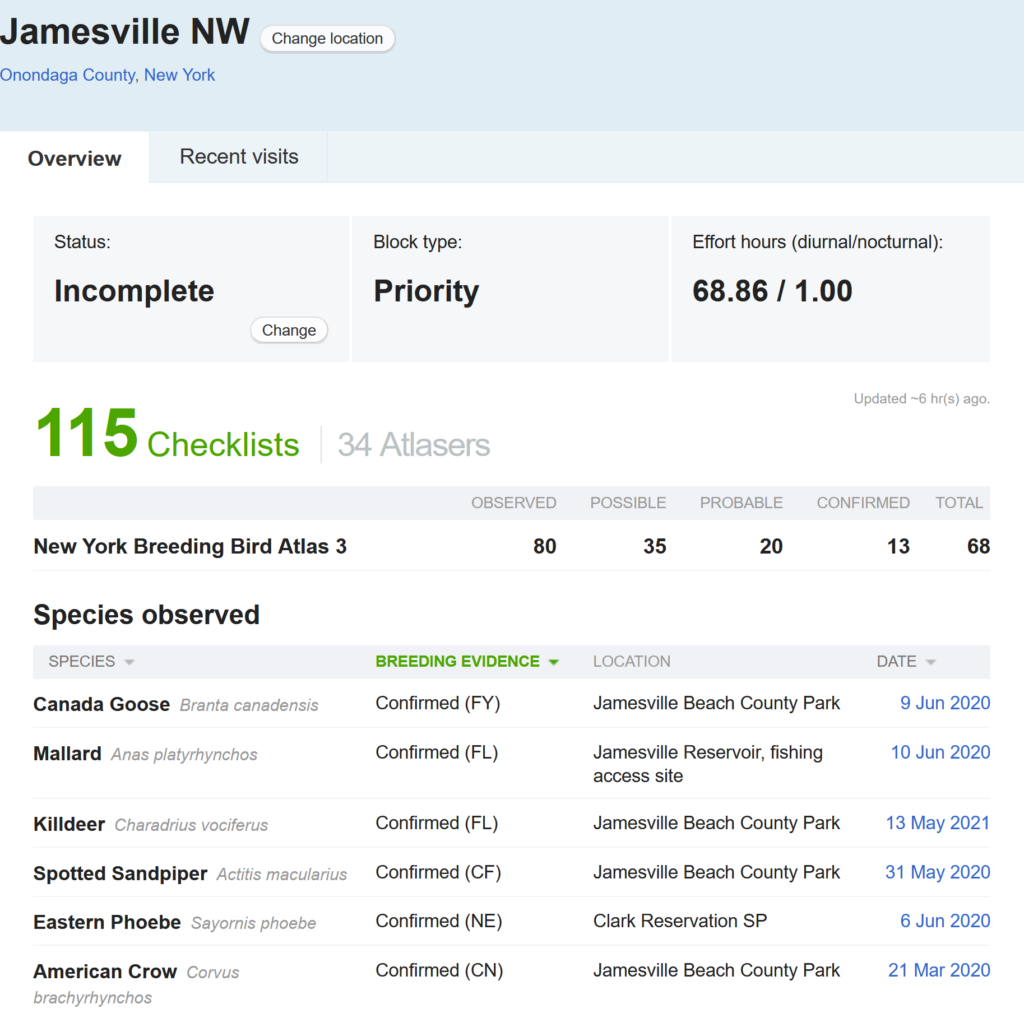
Block summary for the Jamesville NW priority block sorted by confirmed species.
It can be helpful to take this information in the field with you. Some of our favorite ways to do this are taking a screenshot of the webpage (or printing it out), writing the confirmed species down to carry into the field, or using the block summary card to keep track of what species have already been documented. You should still record all breeding observations, but this will help target your atlasing for species that haven’t been confirmed.
Determine what remains to be done
What do you need to do to complete the block? Here’s our quick guide to figuring out what remains to be done to call a block complete. If you believe that a block meets all the completion guidelines, please notify a Regional Coordinator.
An advanced atlasing skill is learning how to interpret habitat types from a satellite map. Improving this skill will not only make you a more competent atlaser, but it can be a fun and rewarding challenge to read a map and anticipate what species you will encounter when you visit in the field. Get started with map reading and identifying major habitat types.
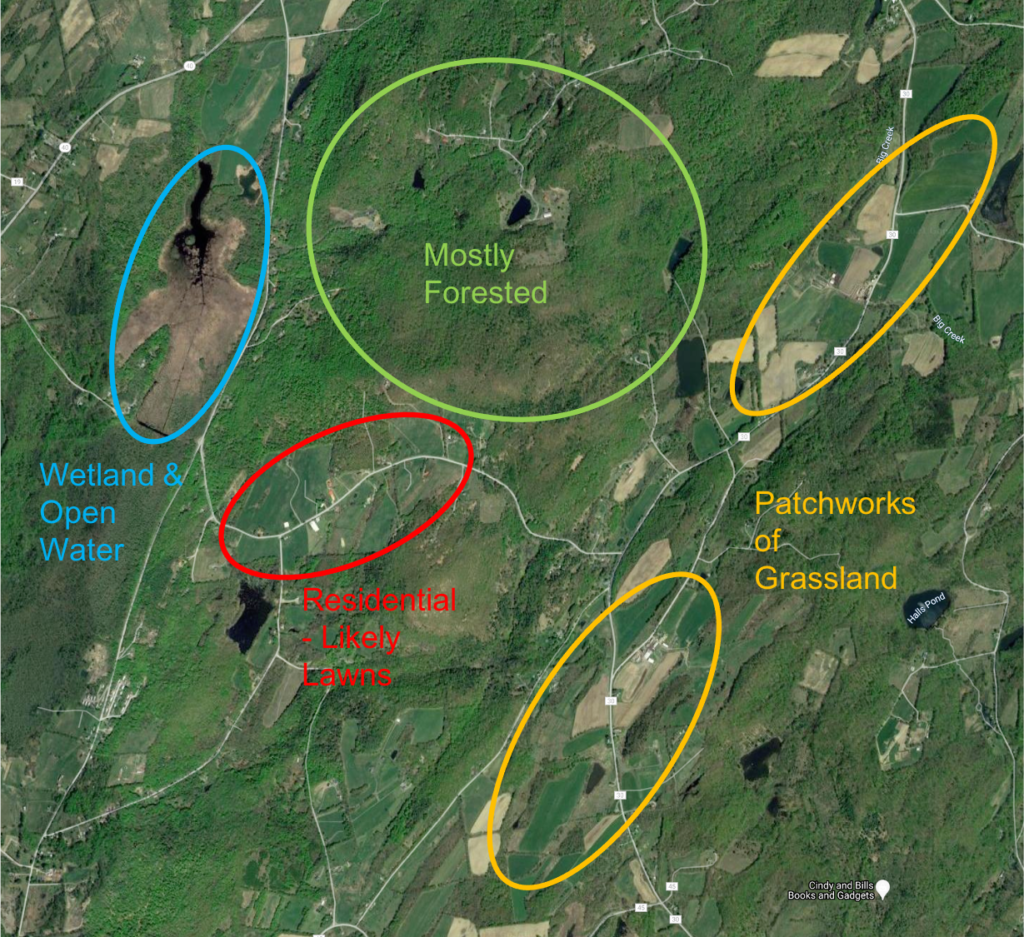
Recognizing different habitat types on satellite images is a valuable skill for planning your atlasing.
Figure out where you can access a block by looking for public property or contacting a landowner. Read more about land ownership and access.
How to navigate blocks in the field
Use the eBird mobile app

Click on the time or distance in your active eBird checklist to see your location in a block.
The single easiest way to tell which block you are in is to use the eBird mobile app. When you have a checklist going in the Atlas portal, you can see block boundaries by tapping on elapsed time or distance on the top of the screen. This only works if you have GPS service (not the same as cell signal!), but fortunately that covers most of the state.
Follow along with this video tutorial about seeing your location in the eBird app.
Use maps
Having maps in the field is often critical to having the most fun while atlasing. Here are some of our tips on how to map your atlasing in the field:
- Navigating/driving using block boundaries in Google Maps
- Using the block maps as GeoPDFs in Avenza/Gaia
- Use paper maps
Plot observations in the correct block
It’s important to plot breeding birds in the block where the bird is located. While this sounds straightforward, it can be trickier than it first seems. Here are some common scenarios.
Use personal locations not hotspots. Hotspots aren’t always in the same block as where you are atlasing, and often a hotspot refers to multiple blocks. Create personal locations so your observations are restricted to the block where you are atlasing. More details with example.
If you see a breeding bird in an adjacent block, record it on your checklist without a breeding code, then create an incidental checklist for the location of the bird and enter the breeding code. Don’t lose a lot of sleep over this–birds don’t know where block boundaries are and if they’re close to a block line are likely using both blocks. More details with example.
If you see a bird in two different blocks on two different checklists, record it with breeding codes both times. The only exception is when the nest location is known (e.g., colonial nesters), in which case you would report it only in the block where the nest is located.
If you go outside of block boundaries, you have two options to correct your checklist.
- If you remember which birds were seen in which block, separate the observations into two checklists (if one has to be an incidental checklist, that’s okay).
- If you can’t remember which birds were seen in which block, move the checklist out of the Atlas portal.
Fixing checklists is more work for you and less accurate, so use all the tips in this article to avoid this situation!